7 Must Know Tips On How To Keep Interlocking A Good Investment
Interlocking stone can be a wonderful way to enhance your Toronto home’s or business landscape, but without the right regular care, your proud surface could wind up looking a bit displeasing over time. Dirt and soil could build up over time in between the fine pores and seams, allowing weeds to grow and water to undermine the structure. One of the best ways to ensure that you enjoy your expansive interlocking landscapes for now and many years to come is to make sure that you have a professional company on hand that can assist you with all of the interlocking stone repair, washing and sealing services you need to keep your landscaping design looking its best. Interlock driveways, walkways and patios are elegant and creates curb appeal, however, when weeds start growing between the stones or pavers start to sink/loosen, it will quickly turn unsightly and very expansive to repair if left untreated ate early stage. Weeds will grow deep roots who will let water through, undermining the foundation of your interlocking, quartz sand under your interlocking stone will start disappearing and your interlocking stones will start shifting and sinking. Keep in mind a complete repair of interlocking can under circumstances surpass the cost of brand new installation.
This can be avoided by following the simple steps below and it will leave your interlock virtually maintenance free for several years.

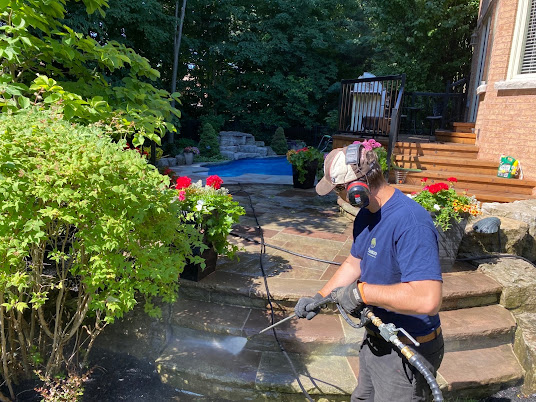
Step 1: Power wash the interlock driveway/walkway/patio
A power wash is the first step to remove stains, debris, weeds and ant colonies. Be sure to clear all unwanted fragments between the joints. Not only will it clean all the unwanted stuff accumulated over months and years but also this will allow polymeric sand to fall into which provides stability for the pavers. This is a time consuming and very messy procedure, make sure you wear rubber boots and protective eye wear because all that dirt and old polymer sand will be air born and potentially hit your face.

Step 2: Fill Polymeric Sand in between paving stones
After cleaning throughout the driveway/walkway/patio, wait about 24-48 hours before pouring polymeric sand. Interlocking bricks and stones must be completely dry. After drying period, pour polymeric sand onto the pavers and sweep it around with a broom. The sand will fall into the joints filling the gaps. Sweeping is the key here, if you think it is enough sweeping, sweep some more, all the sand left on the pavers will turn into solid grains making it impossible to clean.
Step 3: Mist the stone driveway/walkway/patio
After the sand is swapped into the joints and away from pavers, spray the surface with water so the polymeric sand can will settle and keep the stones in place. Be careful not to spray too much water to with high pressure, you don't want to wash away the send.
Step 4: Let the pavers and sand drying
After the misting process is completed, let your interlocking dry for 48 hours. Polymer sand should be rock solid and your patio stones secure in place.
Step 5: Sealing your pavers
Now that the most important part is taken care of, you should consider sealing your improved driveway and walkway. A clear coat of interlocking sealer will seal fine pores in joints and crack in paver stones directly repelling water and dust build up. Choose a commercial grade product, designed for your type of stone. Hardware store might be a good option but explore other contractor suppliers as well. To spray the solution, you need a sprayer as well, if your sealer is water based you can use any type of sprayer but if the sealer is of any oil based product, you need to buy a industrial grade sprayer made for such application. Spray the liquid equally all over your interlocking, you might need to be careful here, more is not necessary better here, you want to avoid over spraying that can cause puddles. If that occurs, you need to have a roller on hand.

Step 6: Let the sealer dry
This is the final step but important one. After sealing is completed, you need to prevent anyone from stepping onto your freshly sealed surface for at least 6 hours. Read manufacturers instructions on how long your sealer needs to settle in and dry.

Perform these 6 steps once every 2-3 years and your interlock driveway, walkway or patio’s curb appeal will be here to stay for very long time.
Should you consider a pro to do the work for you, your local driveway maintenance contractor will be happy to assist you.

Comments
Post a Comment